Lime slaking is one of the key stages during whitewashing and other construction works. Properly slaked lime is used for treating walls, ceilings, foundations, and also helps improve the strength and durability of finishing coatings. In this article, you will learn how to safely and effectively slake lime at home, get answers to frequently asked questions, and useful tips to help avoid common mistakes.
Useful Videos on the Topic
Why It Is Important to Slake Lime
Lime (unslaked) is calcium oxide (CaO), which reacts chemically with water and transforms into calcium hydroxide (Ca(OH)_2), known as hydrated or slaked lime. This process is accompanied by the release of heat (exothermic reaction). Proper slaking ensures:
- Safety: reduction of the aggressiveness of unslaked lime.
- Ease of Work: a well-slaked mixture is easy to apply to the surface.
- Improved Adhesion: stronger bonding with the substrate (walls, foundation, etc.).
- Long Service Life: coatings based on slaked lime have a long service life and resistance to cracking.
Safety and Preparation
Before starting to slake lime at home, it is necessary to prepare properly. Lime dust and splashes can be hazardous to the skin and eyes.
-
Protective Clothing:
- Rubber gloves.
- Goggles or a face shield.
- Work suit with long sleeves (or clothes that you don’t mind ruining).
- Mask or respirator to protect against lime dust.
-
Preparation of the Work Area:
- Protect the floor and furniture with plastic or newspapers.
- Ensure good ventilation, open windows or work outdoors.
- Keep a bucket of water or sand nearby in case of emergencies.
-
Choosing a Container:
- Can lime be slaked in a plastic bucket? Yes, but you need to use plastic that is resistant to high temperatures and chemical effects. Lime releases a lot of heat when slaking, so it is best to use a metal or specially designed fireproof container. If you use a plastic bucket, make sure it is thick enough and intended for construction work.
Step-by-Step Instructions: How to Slake Lime
Step 1: Prepare Unsaked Lime
- Choose high-quality unslaked lime (quicklime). Pay attention to the packaging date and manufacturer’s recommendations.
Step 2: Determine the Proportions
- The most common ratio for whitewashing is 1 part lime to 2 parts water (1:2).
- If a thicker solution is needed, add lime gradually while mixing thoroughly.
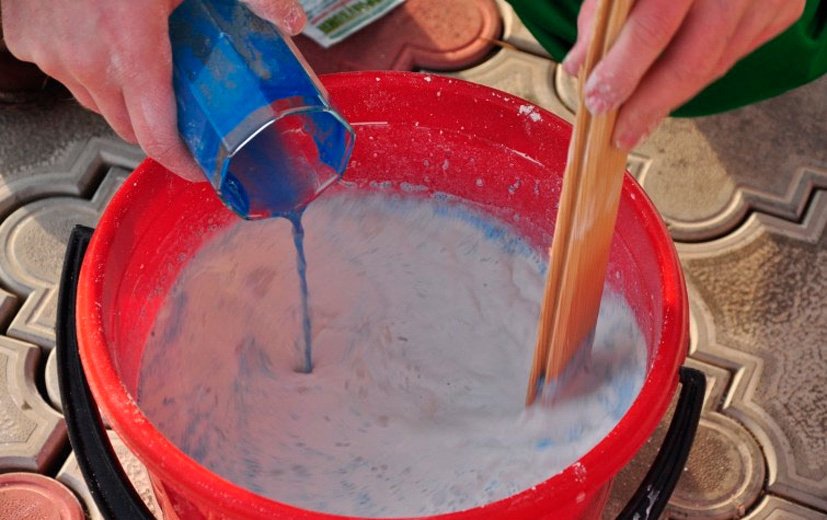
Step 3: Add Water
- Pour the required amount of lime into the prepared container.
- Gradually pour in the water while mixing thoroughly. Pour the water in a thin stream to avoid splashes and a sudden release of a large amount of heat.
Tip: Avoid pouring all the water at once: the reaction is very vigorous, so it is better to divide this process into several stages.
Step 4: Observe the Reaction
- In the first minutes after adding water, the reaction will be active, with the release of heat and steam.
- Continue to mix carefully, without leaning too close over the container.
Step 5: Let the Mixture “Rest”
- After the vigorous reaction has finished, cover the container with a lid or plastic wrap, but leave a small opening for steam to escape. This will help the mixture fully “mature”.
- Depending on the volume and conditions (ambient temperature), the process can take from 30 minutes to several hours.
Step 6: Check Readiness
- Well-slaked lime forms a homogeneous paste-like mass of a whitish color.
- How to check: if the mixture has cooled, does not release strong heat, and there are no lumps of unslaked lime – the slaking process is successfully completed.
Step 7: Use the Solution
- For whitewashing, dilute the mixture with the necessary amount of water (depending on the desired thickness).
- Before applying the solution to the wall or ceiling, it is advisable to filter the mixture (through a fine sieve) or mix well to eliminate lumps.
How to Slake Lime for Whitewashing and Achieve an Even Coating
- Surface Preparation: clean the wall of old paint, dust, grease, or dirt. If necessary, fill in cracks and chips.
- Priming: apply a primer for better adhesion (especially relevant for porous surfaces).
- Application: use a brush, roller, or spray gun. For an even layer, make vertical and horizontal movements.
- Tip: if you are afraid of “brush marks” (streaks from the brush), add a small amount of PVA glue or special plasticizers to the solution. This will help the solution spread more evenly and adhere better to the surface.
Common Mistakes and How to Avoid Them
| Mistake | Consequence | How to Avoid |
|---|---|---|
| Pouring all the water at once | Vigorous reaction, splashes, risk of burns | Pour water in portions, mix thoroughly |
| Insufficient “maturation” time (resting) | Lumps of unslaked lime remain in the solution | Wait for the reaction to finish and check the consistency |
| Incorrect container (too thin plastic) | Melting of the bucket, damage, deformation | Use metal or specially strong plastic |
| Lack of protection (gloves, goggles) | Burns, skin and eye irritation | Always wear PPE (personal protective equipment) |
| Too much water when whitewashing | Weak coating, quick washing out and cracking | Follow recommended proportions and do not overly dilute |
Can You Glue Wallpaper on Lime?
Usually, it is undesirable to glue wallpaper directly onto lime coating because:
- Lime is an alkaline environment that can negatively affect the glue.
- The surface often remains porous and weak for reliable wallpaper adhesion.
How to Prepare the Wall:
- Remove the old layer of lime as much as possible by moistening it and scraping with a spatula.
- Apply a special primer that neutralizes the surface and improves adhesion.
- If necessary, apply putty.
- Only after this, glue the wallpaper according to the glue manufacturer’s instructions.
Additional Tips
- Temperature Regime: the optimal temperature for slaking and application is from +10°C to +25°C. Avoid working in extreme heat or at sub-zero temperatures.
- Storage of Slaked Lime: if there is unused mixture left, pour it into an airtight container and add a thin layer of water on top. This will slow down drying and prevent contact with air.
- Use of Additives: to reduce “brush marks” or improve the properties of the solution, add a small amount of PVA glue or plasticizers. Start with small portions, mixing carefully and controlling the viscosity.
FAQ (Frequently Asked Questions)
-
Can lime be slaked in a plastic bucket?
Yes, but only if the plastic is strong enough and heat-resistant. High temperatures are released during slaking, so ideally, it is better to use a metal container. -
How long does it take before you can paint the walls?
Usually, it takes from 30 minutes to several hours until the reaction stops and the mixture cools down. For large volumes and low temperatures, this time may increase to a day. -
What is the difference between quick slaking and slow slaking?
- Quick slaking: lime reacts vigorously with water, releasing a lot of heat in a short time.
- Slow slaking: occurs by adding small portions of water, the reaction proceeds more smoothly, reducing the risk of splashes. The quality properties of lime are usually better with slower slaking.
-
How to avoid brush marks during whitewashing?
- Use additives (PVA glue, plasticizer) for better spreading of the solution.
- Use a brush with soft dense bristles or a roller.
- Mix the solution thoroughly and work with quick but even strokes.
-
How to store slaked lime if there is leftover mixture?
- Pour into an airtight container, add a little water on top.
- Close with a lid. Lime can be stored for several weeks, but it is recommended to use it as soon as possible.
-
Can you glue wallpaper directly onto lime?
No, it is advisable to remove the lime layer, prime, and prepare the wall. Lime can negatively affect the glue and hinder adhesion.
Conclusion
Slaking lime is an important process that affects the durability and quality of the future coating. Follow safety techniques, choose proportions correctly, and do not rush – allow the lime to fully undergo the reaction. The result will be a stable, elastic mixture that provides reliable and beautiful whitewashing or other treatment. If you plan to glue wallpaper, be sure to prepare the base – remove any remaining lime, apply primer, and use the correct glue.
Follow our recommendations – and working with lime will become significantly easier, safer, and more effective!