Reproducing hibiscus is a simple yet exciting process that allows you to obtain new plants with minimal effort. 🎉 There are several basic methods that every gardener can use to expand their collection of these beautiful flowers. Here’s an overview of the most popular ways to propagate hibiscus:
1. Cuttings – This is the most common method of propagating hibiscus. It involves cutting stem cuttings from a healthy plant, which are then rooted in a substrate. It is optimal to use cuttings that are 10-15 cm long and contain 2-3 nodes.
2. Seeds – Although this method requires more time and patience, it allows for the creation of new varieties. Hibiscus seeds can be sown in special containers filled with peat. To successfully germinate, it is necessary to provide adequate moisture and warmth. 🌱
3. Division of bushes – This technique is suitable for mature plants. It involves dividing the root system. This creates new plants that retain all the characteristics of the parent plant. It is best to carry out this process in spring when the plant begins to grow actively.
4. Grafting – Although this method is more complex and requires certain skills, it allows for the creation of plants with desired traits by combining two plant species. For example, you can graft a hibiscus variety onto a rootstock that is resistant to diseases.
Each of these methods has its pros and cons. For example, cuttings are convenient and quick, while seeds can yield unpredictable but interesting results. 🌼
The choice of method depends on your needs, available time, and experience. Be sure to explore different approaches and choose the one that best suits you and your soil conditions!
Choosing Cutting Material
Choosing cutting material is crucial for the successful propagation of hibiscus. 👌 Before cutting the cuttings, it is important to select a healthy plant that shows no signs of disease or pests. Remember that the quality of the material will significantly affect the chances of rooting and subsequent growth of new plants.
1. Choose the right time
The best time to obtain cuttings is spring or early summer. During this time, plants are actively growing, and their shoots are more flexible, which increases the chances of successful rooting. 🕰️
2. Cut healthy shoots
Select semi-woody or young green shoots that are approximately 0.5-1 cm thick. They should be free of damage and disease. It is not recommended to use old shoots, as they may be too rigid and root poorly.
3. Number of nodes
It is optimal to cut cuttings that are 10-15 cm long with 2-3 nodes, as this allows for enough space for rooting. 📏 Cut at an angle of about 45 degrees to provide a larger area for absorbing water and nutrients.
4. Care for cuttings
After cutting, place the cuttings in a damp cloth or shield them from direct sunlight to avoid drying out. This is especially important if you plan to plant them within a few hours or days. ☀️
5. Choosing varieties
Different hibiscus varieties may have different rooting requirements. Some, such as Chinese Hibiscus, are easily propagated from cuttings, while others may prove to be more finicky. Before cutting, learn more about the characteristics of your hibiscus to choose the most suitable option for propagation. 🌺
By following these tips, you can significantly increase your chances of success when propagating hibiscus from cuttings. Choosing quality material is an important step towards healthy and blooming plants in your garden or pots. Don’t be afraid to experiment and share your experiences with other gardeners!
Optimal Conditions for Rooting
Optimal conditions for rooting hibiscus are key to successful propagation. The more you care for your cuttings, the higher the chances that they will take root and become strong plants. 💧✨
Temperature
Hibiscus prefers warmth. The best temperature for rooting is between 20 and 25 degrees Celsius. 🌡️ Avoid sharp temperature changes, as this can negatively affect the condition of the cuttings. Place them in a warm but not overly sunny spot—direct sunlight for a good part of the day should be avoided to prevent overheating the plants.
Humidity
High humidity is another important factor. It is best to root cuttings in conditions of increased air humidity of 70-80%. 💦 You can create small greenhouses from plexiglass or plastic containers. Alternatively, simply cover the cuttings with clear plastic to retain moisture. Ensure that the cuttings do not touch the covering surfaces to avoid rot.
Substrate
It is important to use a light, airy, and well-drained substrate. An ideal option is a mixture of peat, sand, and perlite in a ratio of 2:1:1. This way, you will provide the cuttings with sufficient access to air and moisture! 🌱
Watering
Regular but moderate watering also plays an important role. Ensure that the substrate remains moist but not waterlogged. Excess moisture can lead to root rot. 🪴 To check moisture, simply press on the top layer of soil—if it feels dry to the touch, it’s time to water!
Ventilation
Don’t forget about regular ventilation of the greenhouse or containers! This will help prevent the development of fungal diseases that can threaten your cuttings. During the day, open the covering for 20-30 minutes to allow fresh air in. 💨
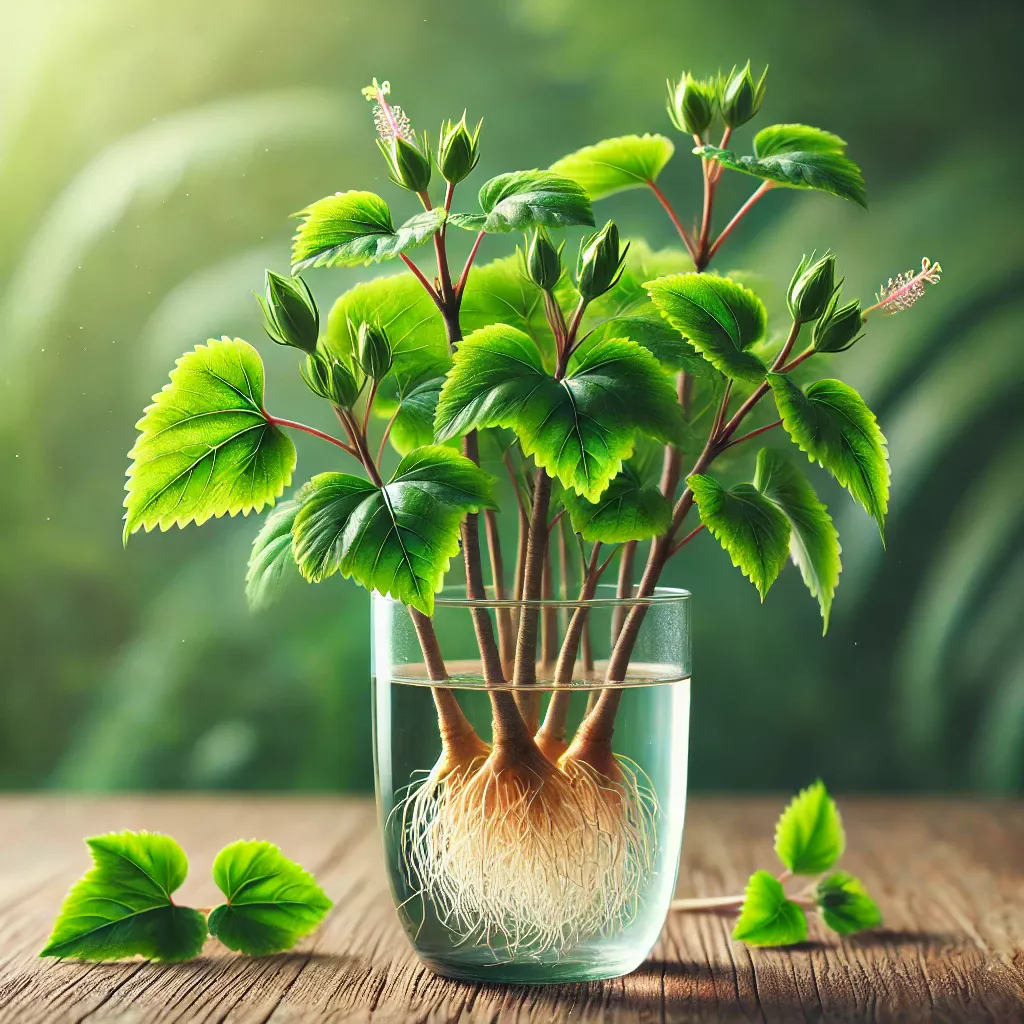
Rooting Time
Typically, hibiscus cuttings root within 2-6 weeks. Sometimes it may take longer, depending on the conditions and variety. Therefore, it is important to patiently monitor the plants until new signs of growth, such as leaves or roots, appear. ⏳
By creating optimal conditions for rooting, you will give your cuttings excellent chances for a successful start in life. 🌺 Remember that your attention and efforts will be rewarded with luxurious flowers in your garden!
Preparing Cuttings Before Planting
Preparing cuttings before planting is a critical stage, as proper preparation can significantly increase the chances of successful rooting and subsequent growth of your hibiscus. 🎉 Once you have selected and cut the cuttings, it is important not to miss this opportunity and take a few simple but effective steps.
1. Cleaning the cuttings
Before planting the cuttings, it is advisable to treat them. This will reduce the risk of fungal or pest infections. Take the cut parts and rinse them under warm water to remove any possible contaminants. 💧
2. Treating the cut
After cleaning, you can apply special rooting hormones (growth stimulants) to the cuts, which stimulate root growth. This is not mandatory, but it can greatly increase the chances of success. Dry cuts, or those that have begun to dry out, should be cut again to obtain a fresh and healthy cut.
3. Preparing the substrate
Before planting the cuttings, prepare the appropriate substrate. It should be light, airy, and well-drained. You can use a mixture of perlite, vermiculite, and peat in a ratio of 1:1:1. 🌱 This mixture provides optimal conditions for rooting.
4. Planting technique
When planting cuttings, it is important to immerse them in the substrate to a depth of at least 2-3 cm, preferably up to the first node. This will ensure better contact with the soil and increase the chances of rooting.
5. After planting
After planting the cuttings, water them gently to avoid washing away the substrate. Use a spray bottle to moisten the soil. 💦 Place the cuttings in conditions of increased humidity by covering them with clear plastic or a glass jar, thus creating a greenhouse effect.
6. Monitoring
Finally, after planting the cuttings, it is important to monitor them. Keep an eye on the moisture level in the substrate and minimize temperature fluctuations to avoid stress for the plants. 🌡️ Regularly check for signs of rot, and ultimately ensure that the cuttings receive enough light, but not direct sunlight.
By implementing these simple steps, you will create optimal conditions for rooting your hibiscus cuttings. Don’t forget to show patience and attention, as without them even the best methods may not yield the expected results. 🌺 Your perseverance will surely be rewarded with beautiful flowers in the future!
Watering and Caring for Cuttings
Watering and caring for cuttings are key aspects that can significantly affect the success of hibiscus rooting. 🪴 A proper approach during this period will ensure not only healthy growth of young plants but also their future viability. Here are some useful tips for optimal care of cuttings.
1. Watering
The initial watering of the cuttings should be moderate. 💦 Use well-settled water at room temperature. The first watering should be done immediately after planting the cuttings, but be careful not to flood them. After that, monitor the moisture of the substrate, which should not dry out. Ideally, maintain a moisture level so that the substrate is always slightly moist but not waterlogged. You can determine moisture using a simple test: press on the top layer of soil—if it’s dry, it’s time to water! 📏
2. Air Humidity
Hibiscus requires high humidity, especially during the rooting period. Try to create a small greenhouse by covering the cuttings with a clear bag or glass to retain moisture. 🌥️ If you cannot organize a greenhouse, periodically mist the cuttings to maintain humidity in the air. This is very important, as low humidity can lead to drying out, negatively affecting further growth.
3. Lighting
Since the cuttings do not yet have a developed root system, it is important to avoid direct sunlight, which can dry them out. 🌞 It is best to place them in a bright but shaded area. You can use special plant lamps if natural lighting is unavailable or insufficient.
4. Temperature
Temperature is another important factor. Hibiscus feels best at temperatures of 20-25 degrees Celsius. 🌡️ Avoid sharp temperature fluctuations, as they can cause stress to the plants. Place the cuttings in rooms with stable temperatures, away from air conditioners and heaters.
5. Watch for signs of problems
Regularly check the cuttings for signs of rot or disease. 🦠 If you notice dark spots or that the cuttings have become soft, this may indicate rot. In this case, immediately remove the affected parts and check for excess moisture in the substrate. Don’t forget about ventilation to avoid moisture buildup and disease development.
By paying attention to watering and caring for the cuttings, you will provide them with a reliable start in life. 🌺 Considering all these aspects will increase the chances of rooting and growing beautiful, healthy hibiscus plants that will become a true decoration of your garden!
Using Growth Stimulators
Growth stimulators play an important role in the process of rooting hibiscus cuttings, as they can significantly increase the likelihood of success. 🌱 In nature, plants actively use hormones to stimulate growth and development, and we can take advantage of them in gardening. So, let’s consider what growth stimulators are, what types exist, and how to use them correctly.
1. What are growth stimulators?
Growth stimulators are substances that promote plant growth, improve their metabolism, and enhance rooting. They can be of natural or synthetic origin and usually contain hormones such as auxins, cytokinins, and gibberellins. 🌿 By using such stimulators, you can significantly accelerate the rooting process of cuttings and facilitate their unhindered development.
2. Types of growth stimulators
There are several main types of growth stimulators that can be used when propagating hibiscus cuttings:
- Auxins – these are hormones that promote root formation. The most common representative is, for example, myaflexin.
- Cytokinins – stimulate cell division and can improve shoot growth.
- Gibberellins – are responsible for increasing stem growth and preventing plant aging.
3. How to use growth stimulators?
Using growth stimulators is a fairly simple process, but it requires adherence to some recommendations:
- Choosing the concentration: Follow the instructions on the package, as different products have their optimal concentrations for use.
- Treating the cuttings: Before rooting, dip the lower part of the cuttings in powder or solution of the stimulator (70-80% concentration). This will ensure their maximum effectiveness.
- Don’t overdo it: Using stimulators in excessive amounts can have the opposite effect, so maintain a balance.
4. Possible risks
While growth stimulators can be very helpful, it is important to remember the possible risks of their use:
- Improper use can lead to plant suppression or reduced natural immunity.
- Chemical residues may contain substances harmful to health, so they should be used with caution.
Using growth stimulators helps unlock the potential of your hibiscus cuttings; however, it is important to maintain a balanced approach and use them correctly. 🌼 This way, you can obtain strong and luxurious plants that will become a wonderful decoration for your garden.
Remember that proper care for cuttings and the use of growth stimulators are the keys to successful hibiscus propagation, which will delight you with its blooming in the near future! 🌺✨
Common Mistakes in Propagation
Propagating hibiscus from cuttings is a process that can be not only interesting but also full of challenges. Usually, experienced gardeners have their secrets, but beginners may encounter certain mistakes that should be avoided. 🤔 The most common problems faced during hibiscus propagation are related to cutting preparation, their care, and the choice of conditions for rooting. Here are some key mistakes to be aware of:
1. Incorrect choice of cuttings
Before proceeding to rooting, it is important to choose the cuttings correctly. ✅ A great option is semi-woody shoots that have 2 to 3 nodes. Using cuttings that are too old or too young can lead to a low likelihood of rooting.
2. Poor substrate preparation
The substrate is the foundation for healthy root growth. 🌱 Using heavy, poorly drained soil can lead to root rot. Remember that the substrate should be light and airy, capable of retaining moisture but not holding excess water.
3. Excessive or insufficient watering
Watering is a critical stage. 🥵 If the cuttings are overwatered, it will lead to rot, and if they dry out, they will die. Ensure that the soil remains slightly moist at all times and avoid water stagnation.
4. Incorrect lighting conditions
Hibiscus cannot tolerate direct sunlight during propagation. 🌞 Insufficient or excessive lighting can negatively affect rooting. It is best to place the cuttings in a bright but slightly shaded area until roots appear.
5. Ignoring air humidity
High air humidity is the key to success. 🌧️ Many gardeners underestimate this factor. Maintaining humidity at 70-80% can be achieved using makeshift materials such as plastic wrap or special greenhouses.
6. Incorrectly hastening rooting
Sometimes gardeners try too hard to speed up the rooting process by using excessive amounts of growth stimulators. ⚠️ This can lead to the opposite effect, so it is important to follow the instructions on the package.
7. Lack of patience
Instead of giving the cuttings time to root, gardeners often try to check their condition too quickly. ⏳ Successful rooting can take from 2 to 6 weeks, so give them a chance.
Always remember that successful propagation is a combination of the right choice of cuttings, creating favorable conditions, and care. By implementing these tips, you can avoid many mistakes that often occur with beginners and increase your chances of success in obtaining healthy and beautiful hibiscus! 🌺✨
Transplanting Rooted Plants
Transplanting rooted hibiscus plants is an important stage, as it allows young plants to develop in more spacious conditions and provides them with access to necessary nutrients. 🌱 Once your cuttings have rooted and show signs of healthy growth, it’s time to move them to new pots. Here are some key aspects to consider during this process.
1. Choosing the right time for transplanting
It is best to transplant rooted cuttings in spring when the plants begin to grow actively. This way, young hibiscuses will more easily endure the transplant and will be able to adapt more quickly to new conditions. 🌞
2. Preparing new pots
When choosing new pots, pay attention to their size. 🚪 The new container should be 2-3 cm larger than the previous one to give the plant enough space for root system development. Also, don’t forget about drainage—the bottom of the pot should have holes for water drainage to avoid root rot.
3. Substrate for transplanting
Use a light and aerated substrate that provides good drainage. An ideal option is a mixture of peat, perlite, and vermiculite in a ratio of 2:1:1. 🌿 This will create optimal conditions for root growth and prevent overwatering.
4. Caution during transplanting
Be very careful during transplanting to avoid damaging the delicate roots. 🌼 Gently remove the plant from the old pot, holding it by the stem, and carefully loosen the root ball if necessary. If the roots are tangled, separate them gently without excessive pressure.
5. After transplanting
After transplanting, water the plant to strengthen the new contact between the roots and the substrate. 💧 Allow another week for adaptation, avoiding direct sunlight so that your new hibiscus can recover from the stress. Keep it in a warm place with good air humidity.
6. Post-transplant care
Continue to care for the plant, carefully monitoring the moisture and temperature levels. 🌡️ Once your plant begins to grow actively, you can return it to its normal watering routine. Don’t forget about fertilization, as this will help the plant recover and grow faster.
With these simple tips, you will be able to successfully transplant rooted hibiscus cuttings, and they will surely reward you with their luxurious blooms in the future! 🌺 Remember that proper care and timely transplanting are the keys to successful growth and development of your plants.