When it comes to puttying OSB boards, it is important to know which materials are used to achieve the best results. First of all, it is worth noting that OSB boards, made from wood fibers, have certain features, so it is necessary to choose a putty that is suitable for such surfaces.
One of the main materials for puttying is water-based putty. It differs from others in that it has low toxicity, is easy to apply, and dries quickly. Due to its elasticity, this putty can compensate for minor movements of the boards without cracking. Various brands are suitable for OSB boards, but finishing putty is often used, which provides a perfectly smooth surface for further painting or cladding.
Equally important is gypsum composite. This material adheres well to OSB boards and allows for a thin and smooth coating. Gypsum putty absorbs moisture well, making it suitable for indoor spaces where there is no risk of water exposure.
Among popular materials, latex putties should also be mentioned. They are convenient to use, have no sharp odors, are resistant to vibrations, and can be used for both indoor and outdoor work. Latex putties provide high adhesion, which helps the putty adhere better to the OSB surface.
Also consider reinforcing mixtures, which can be used for puttying the joints between boards. They prevent the appearance of cracks and contribute to the durability of the coating. Such mixtures usually contain fibers that enhance elasticity and strength.
Here is a brief overview of the main materials for puttying:
| Material | Properties | Usage |
|---|---|---|
| Water-based putty | Low toxicity, elasticity | Indoor work |
| Gypsum composite | Smooth coating, moisture-absorbing | Indoor spaces |
| Latex putties | High adhesion, odorless | Indoor and outdoor work |
| Reinforcing mixtures | Prevent cracks | Joints between boards |
Thus, one of the key stages in the process of “how to putty OSB boards” is the correct choice of putty that will meet your needs and the specifics of the work.
Preparing OSB Boards for Puttying
Before puttying, OSB boards require careful preparation, as the quality of the applied layer and its durability depend on this. First of all, it is necessary to check the flatness of the boards. Using a level, determine whether there are depressions or elevations on the surface. It is important for the board to be stable, so if you find significant irregularities, consider correcting these defects before puttying.
The next step is to clean the boards of dirt, dust, and other contaminants. You can use a soft brush or a moisture-resistant cloth for this. If there are traces of grease or other difficult-to-clean substances on the surface, it is recommended to use non-abrasive cleaning agents to avoid damaging the OSB structure.
After cleaning, it is important to assess the overall condition of the boards. In case of cracks, chips, or other defects, they should be carefully filled with special putty or use reinforcing tape for joints, which will improve adhesion and prevent further crack propagation. This is especially relevant if the OSB boards will be subjected to mechanical loads or vibrations.
Next, it is necessary to set a base for the putty. For this, a primer should be applied to the board. The primer will help improve the adhesion of the putty to the surface and reduce its absorption, which will save material in the long run. It is recommended to choose primers that are easy to apply and dry quickly. It is better if the primer is water-based, suitable for indoor spaces.
Do not forget about the temperature conditions under which the puttying is performed. The optimal temperature for this process is around 20-25 degrees Celsius. At low temperatures, as well as high humidity, materials may not set properly, negatively affecting the final result. The process of preparing OSB boards should not be ignored, as it is the key to the quality execution of the entire process.
From all of the above, the preparation of OSB boards includes the following key steps:
- Assessing the flatness and integrity of the boards.
- Cleaning from contaminants and dust.
- Filling defects and cracks.
- Applying primer to improve adhesion.
- Maintaining optimal temperature conditions.
Thus, proper preparation of OSB boards is the key to successful puttying. Only by following all recommendations can you achieve the desired result and perform quality puttying of OSB boards, which will enhance the durability of the finished surfaces.
Choosing Putty: Types and Properties
When choosing putty for OSB boards, it is important to pay attention to its characteristics and types, as this directly affects the quality of work and the durability of the coating. Among the available options for putties, several key types that are most commonly used in construction practice should be considered.
Dry mixtures are the most common. They are produced in powder form, and water needs to be added for their preparation. This type of putty has high strength and can be used for various types of surfaces, including OSB. Gypsum or cement dry mixtures are usually recommended for indoor work. Many of them are easy to use, which accounts for their popularity among craftsmen and DIY enthusiasts.
No less well-known are polymer putties, which, unlike dry mixtures, are ready to use, significantly saving time. They are characterized by excellent adhesion and elasticity. Polymer putties are great for all types of indoor surfaces and can eliminate the risk of cracking. When applying such putties, it is important to follow the manufacturer’s instructions for application.
In addition, there are specialized putties that are suitable for specific conditions, such as humid rooms or areas with intense mechanical loads. For bathrooms or kitchens, moisture-resistant putties should be chosen, which provide additional protection against moisture and fungal formations. This increases the durability and aesthetics of the finished surfaces.
Colored putties are also gaining popularity. They allow you to achieve the desired shade immediately without the need for additional painting. This can be especially useful if you plan to have bright decorations or unique design solutions.
Here is a brief description of the main types of putties that can be used for OSB boards:
| Type of putty | Advantages | Disadvantages |
|---|---|---|
| Dry mixtures | High strength, ease of application | Need for mixing and preparation |
| Polymer putties | Elasticity, excellent adhesion | Higher cost |
| Specialized putties | Moisture resistance, long service life | May have limited color choices |
| Colored putties | Ability to achieve a shade without painting | Less variety in texture and properties |
Thus, when choosing putty for OSB boards, focus on the specifics of the work and the operating conditions. It is important to consider not only the type of material but also the conditions under which the finished surface will be used. Understanding the features of putty will help achieve the best result!
Tools for Puttying
For successful puttying of OSB boards, it is important to have the necessary tools at hand, which will significantly facilitate the work and ensure a quality result. The right choice of tools affects not only the speed of the process but also the level of the finished surface.
The first and perhaps the most important tool is the spatulas. They come in various sizes and shapes, allowing you to choose them depending on the area and type of work. Wide spatulas are ideal for applying putty to large areas, while narrow spatulas are used for processing corners and hard-to-reach places. It is important that the spatulas are made of quality materials that do not dull during use.
The next important tool is a mixing container. If you are using dry mixtures, you will need a container in which it is convenient to mix the putty with water until a homogeneous consistency is achieved. Always follow the proportions indicated by the manufacturer, as this will affect the final result.
Also, do not forget about rollers and brushes. They can be useful for applying primer before puttying, as well as for covering surfaces that do not need to be treated with putty. It is important to use rollers with short pile for even application of the primer.
Additionally, sanding tools will be useful. They allow you to achieve a smooth finish after applying and drying the putty. You can use sanding blocks or electric sanders. Don’t forget about sanding nets, which will also come in handy.
For accurate measurement and marking on the boards, you may need a ruler, tape measure, and a marking pencil. This is especially important if you need to make precise measurements or ensure the correct distance between the boards.
Another consumer item that is often forgotten is gloves. When working with putties and other building materials, it is important to protect your hands. Use gloves made of quality material to prevent contact with chemicals.
Here is a short list of the main tools to prepare:
- Spatulas (wide and narrow).
- Container for mixing materials.
- Rollers and brushes for priming.
- Sanding tools (blocks, electric sanders).
- Ruler, tape measure, pencil.
- Gloves for hand protection.
Equipping yourself with all the necessary tools, you can confidently tackle the puttying of OSB boards, knowing that everything you need is at hand to achieve a quality result.
Technique for Puttying OSB Boards
The process of puttying OSB boards requires not only quality materials but also the right technical techniques. Before starting, make sure that the preparation of the boards has been carried out according to the recommendations. When everything is ready, you can move on to the main stages of applying the putty.
The first step in the puttying technique is applying the primer. This will help create a good base for the putty, reducing its absorption and increasing adhesion to the surface. Apply the primer using rollers or brushes, evenly covering the entire area of the boards. Wait for the primer to dry completely, which usually takes about 1-2 hours depending on the temperature and humidity in the room.
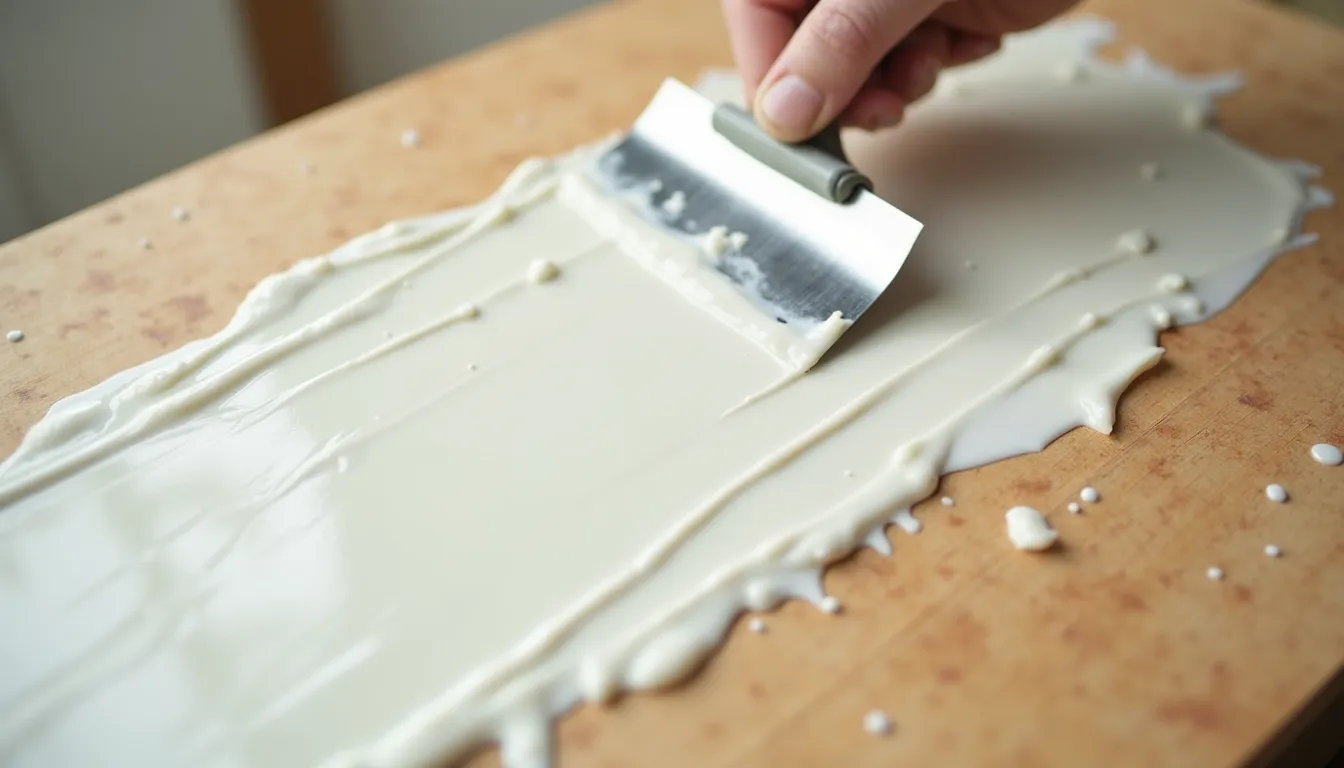
Next, we move on to applying the putty. Using a wide spatula, take a small amount of putty and apply it to the board in one direction. The movements should be smooth, without strong pressure, to avoid the formation of air bubbles. It is recommended to apply the putty in several thin layers rather than one thick one, as this helps avoid cracking after drying. If you are applying putty to large areas, follow a system: first treat the top part, then move to the middle, and finally treat the edges.
After applying the first layer, let it dry, choosing the time according to your putty material. But remember that this usually takes from 2 to 24 hours. Then, when the first layer becomes firm and smooth, use sanding tools to achieve a perfect surface. Sanding should be done carefully to avoid damaging the base while removing all irregularities or defects.
If after sanding you find that additional coverage is still needed, apply a second layer of putty in the same way. Repeat these procedures until you achieve the desired coverage. It is also important to remember about breaks: between applying different layers, it is worth allowing air to circulate and increasing ventilation in the room.
When the last layer dries, go over it again with sanding tools. Finally, you can perform a final cleaning of the surface from dust, and then move on to painting or decorative cladding.
Thus, in the process of “how to putty OSB boards,” it is important to follow the correct application technique: priming, applying putty, sanding, and repeating actions until the desired result is achieved. These simple steps will help you achieve a quality and long-lasting result that will satisfy even the most demanding owners.
Drying and Further Processing
Drying the putty is a critically important stage that is often underestimated. After completing the application of putty on OSB boards, it is important to allow enough time for drying to avoid cracks and odors later on. It should be noted that drying times depend on the type of putty, temperature, and humidity in the room.
In general, instead of relying solely on the time indicated on the putty packaging, pay attention to its consistency and condition. Many manufacturers recommend conducting a touch test to determine whether the putty is sufficiently dry. If it feels hard to the touch, this may be a signal that the process can continue.
Once the putty is completely dry, it is recommended to perform sanding, which will help level the surface and remove any possible irregularities. Both hand sanding blocks and electric sanders are suitable for this. Use medium-grit sandpaper for the first treatment, and then switch to fine-grit to achieve perfect smoothness.
It is recommended to perform sanding in a well-ventilated area, as a lot of dust may be generated during the work. Always wear a protective mask and goggles to ensure safety while working.
When sanding is complete, do not forget to clean the surface from dust, as leftover particles can affect the quality of the subsequent processing stages. You can use a moist cloth or a vacuum cleaner with a soft surface attachment for this.
After cleaning, check the surface for defects. If any are found, do not leave them. Apply another thin layer of putty to the identified defects, then repeat the drying and sanding process.
In the future, when you finish processing the putty and smooth the surface, you can move on to finishing works such as painting or decorating. It is important not to rush into applying paint, as proper drying of the putty will ensure better adhesion of materials and adherence to aesthetic characteristics.
In general, the stages of drying and further processing of the putty include:
- Waiting for the putty to dry completely.
- Sanding to create a perfectly smooth surface.
- Cleaning from dust.
- Checking for defects and correcting them.
- Moving on to finishing works.
Thus, adhering to the technology of drying and further processing of the putty is an integral part of the process of “how to putty OSB boards.” This will not only increase the durability of your coating but also ensure the aesthetics of the finished surfaces.
Common Mistakes in Puttying
Puttying OSB boards can be simple if you avoid common mistakes that can affect the final result. One of the biggest mistakes is applying the putty in one thick layer. Such actions can lead to cracks, irregularities, or even peeling. It is much more effective to apply the putty in several thin layers, giving each enough time to dry.
Another common mistake is insufficient sanding of the surface between layers. If sanding is not done between layers, this can lead to irregularities that will later be visible after drying. Sanding not only complements the coating but also improves adhesion between layers of putty.
Many also forget the importance of surface preparation. Skipping cleaning or ignoring cracks and defects before puttying can negatively affect the quality of the final product. Before applying putty, it is important to thoroughly clean the OSB boards from dust, dirt, and remnants of old finishes, as well as fill all cracks and defects.
Equally important is to pay attention to environmental conditions during work. High humidity or low temperature can significantly slow down the drying process of the putty or even lead to improper adhesion. Therefore, for proper puttying of OSB boards, it is worth choosing optimal conditions: a temperature of about 20-25°C and moderate humidity.
Another mistake is ignoring the manufacturer’s recommendations regarding drying time and application. Each manufacturer provides specific instructions that are important to follow, as this will affect the quality of the finished surface. Improper preparation or application of putty can lead to stains, an unsightly appearance, or even more serious problems.
In general, here are some key mistakes to avoid:
- Applying putty in one thick layer.
- Not considering the need for sanding between layers.
- Ignoring surface preparation before work.
- Neglecting environmental conditions during work.
- Skipping the manufacturer’s recommendations for all stages of the process.
Therefore, to achieve a quality result in the matter of “how to putty OSB boards,” it is important to avoid these common mistakes and adhere to proven technology. This will help ensure the long-term aesthetics and functionality of your surfaces.
Caring for Finished Surfaces
After completing the puttying of OSB boards, it is important to properly care for them to maintain their original appearance and functionality for a long time. One of the key aspects of caring for finished surfaces is adhering to the composition of wet and dry cleaning agents. It is important to use soft sponges or cloths that do not damage the putty and do not leave scratches on the surface.
Regular cleaning from dust and dirt will help maintain the aesthetic appearance of your finish. When cleaning, avoid aggressive chemical agents that can damage the protective layer of the putty. It is recommended to use plain water with a small amount of liquid soap. This is not only effective but also safe for your surfaces.
In addition, there are two main categories of care:
- Damage prevention: Regularly check the condition of the surface to detect cracks or other defects in time. If necessary, fill the identified defects with a thin layer of putty and sand to avoid further damage.
- Protection from external influences: If your OSB boards are used in conditions of high humidity or temperature fluctuations, consider using protective oils or varnishes for additional surface coverage.
It is important to remember that if you plan to carry out any cleaning or care work on the surfaces, well-dried putties should withstand a certain level of humidity. Therefore, after conducting water procedures, it is important to give the surface some time to dry, especially in enclosed spaces.
However, do not forget about the possibility of moisture and dirt accumulating on the surface, which can lead to the appearance of mold or other unwanted growths. To prevent such situations, it is important to maintain proper ventilation in the room and avoid moisture accumulation.
Thus, proper care for the finished surfaces of OSB boards will not only extend their service life but also enhance the aesthetics of your interior. By following simple recommendations, you can enjoy quality puttying for many years.