
The rapid increase in energy prices is prompting more and more homeowners and summer cottage owners to pay attention to alternative heating sources. One of the most popular solutions is a heating stove, which is not only capable of effectively heating a home but can also perform cooking functions if necessary. In this article, you will learn how to make a stove by yourself, the types of stoves available, and you will receive a step-by-step guide with the main nuances of installation.
Useful videos on the topic that I recommend watching
Why you should make a stove by yourself
- Cost savings. Building a stove by yourself usually costs less than buying and installing ready-made heating systems.
- Individual approach. You can take into account all the features of your house: area, layout, insulation, heating needs, and cooking requirements.
- Quality control. Choosing materials yourself and carefully following the technology gives confidence in the reliability and durability of the structure.
Main types of heating stoves
Before making a stove by yourself, it is important to determine the type of design and fuel.
1. Ceramic (brick) stove
- Advantages: long service life, high heat capacity (retains heat for a long time), the possibility of creating a heating-cooking stove with a cooking surface or oven.
- Disadvantages: heavier weight (requires a reliable foundation), more complex masonry, requires masonry skills.
2. Metal stove (steel or cast iron)
- Advantages: relatively lighter construction, simpler installation, heats up quickly.
- Disadvantages: cools down faster, sometimes requires additional insulation, may distribute heat unevenly.
3. Stove-fireplace
- Advantages: combination of heating and fireplace functions for a cozy atmosphere; modern design.
- Disadvantages: requires careful calculation of the chimney to avoid smoke; requires experience for self-construction.
4. Stove with water circuit
- Advantages: the ability to distribute heat through a system of pipes and radiators throughout the house.
- Disadvantages: more complex installation, must adhere to sealing and safety rules.
5. Heating-cooking stove by yourself
- Advantages: simultaneously heats the room and allows cooking on the cooking surface or in a built-in oven.
- Disadvantages: requires skill in masonry and installation of special stove elements (grates, doors, dampers) for proper operation.
Choosing materials and tools
Materials
- Firebrick (for the inner part that contacts high temperatures) or regular red brick (for external masonry).
- Stove clay or heat-resistant mortar for masonry (used inside the firebox).
- Grates – a metal grid on which fuel will burn and through which ash will fall.
- Metal elements: doors for the firebox and ash pit, dampers, chimney pipe.
- Insulation materials: mineral wool, basalt slabs, or other fire-resistant insulators to protect walls and ceilings.
- Foundation materials: cement, sand, gravel (if necessary).
Tools
- Measuring tape, square, construction level – for accurate measurements and geometry control.
- Hammer, trowel, spatula – for masonry work.
- Welding machine, angle grinder – for preparing and installing metal elements (especially relevant if you are making a stove-fireplace by yourself).
- Additional tools: bucket, container for mortar, drills, etc.
Step-by-step instructions: how to make a heating stove by yourself
1. Project and preparation of the site
- Develop a project or find a ready-made masonry scheme that meets your needs (heating-cooking stove, stove-fireplace, etc.).
- Determine the location for installation. Consider the location of load-bearing structures, proximity to flammable materials, and convenience of connecting the chimney.
- Check fire safety requirements: protect walls with non-combustible screens or insulation, maintain sufficient distance from furniture, electrical wiring, etc.
2. Pouring the foundation (if necessary)
- If the future heating stove has a large mass (especially brick), a separate foundation is needed.
- Dig a pit 50–70 cm deep (depending on the type of soil).
- Make a sand cushion by pouring 10–15 cm of sand and compacting it.
- Install formwork, reinforcement, and pour with concrete.
- Wait for the complete drying of the foundation (at least 7–14 days).
3. Installation of the base and waterproofing
- Lay a layer of waterproofing (for example, roofing felt) or another waterproof material on the foundation.
- Perform rough masonry in one or two rows of bricks to level the base. Use a level and square during this process.
4. Masonry of the firebox and chimney channel
- Masonry of the first row – especially important: it sets the geometry of the entire structure. Check the level of each brick.
- Forming the ash pit: install the ash pit door, provide space for the grates.
- Firebox (combustion chamber): lay with firebrick. Join elements with a mixture based on stove clay or special heat-resistant glue.
- Installation of the firebox doors: secure them with wire or steel corners in the masonry joints.
- Forming smoke channels: strictly follow the scheme. The design of the channels affects the efficiency of heating and gas removal.
- Installation of the cooking surface (if you are building a heating-cooking stove by yourself): usually this is a cast iron plate with removable rings. It is installed at the top of the firebox.
- Transition to the chimney: follow the scheme, gradually narrowing or keeping the channel straight (depending on the type of stove).
5. Erection of the chimney
- Chimney can be brick or metal.
- For a brick chimney, follow the same masonry system using heat-resistant mortar.
- When installing a metal pipe, it is important to use a sandwich structure (pipe within a pipe with insulation) to reduce heat loss and condensation risk.
- Output of the pipe to the roof: follow building codes – properly treat the passage through the ceiling and roof with fire-resistant materials.
6. Cladding and finishing work
- After completing the main masonry and installing the chimney, you can perform cladding with bricks, tiles, or plaster.
- If you are building a stove-fireplace by yourself, decorative stone or heat-resistant ceramic tiles are often used.
- Check the draft: open the ash pit, light paper. Smoke should freely go into the chimney.
- Conduct a test fire: initially limit the amount of firewood, start a small fire, gradually increasing the temperature so that the stove dries out and “gets used” to thermal loads.
Features of operation of different types of stoves
Wood stoves
- Advantages: high heat output, heat accumulation, the possibility of using available types of fuel (wood, briquettes).
- Disadvantages: the need for regular fuel loading, cleaning of ash, strict adherence to fire safety.
Gas stoves
- Advantages: automated control of fuel supply, stable operation with centralized gas supply.
- Disadvantages: require special permits, installation of gas equipment with appropriate safety automation, and regular inspections.
Electric stoves
- Advantages: ease of installation, no need for firewood and ash cleaning, minimal ventilation requirements.
- Disadvantages: energy dependence, costs for electricity, possible network power limitations.
Safety and maintenance tips
- Fire safety: keep flammable materials and objects away from the stove, regularly check the condition of the chimney.
- Ventilation: ensure sufficient fresh air supply, especially if the stove is used frequently and intensively.
- Cleaning: regularly remove ash from the firebox and ash pit, clean the chimney from soot (usually 1–2 times a year).
- Technical inspection: check the tightness of the doors, integrity of the masonry joints, condition of the grates and metal elements.
- Ignition and heating: avoid heating the stove too quickly. It is better to ignite gradually so that the materials do not deform from a sudden temperature spike.
Common mistakes during stove construction
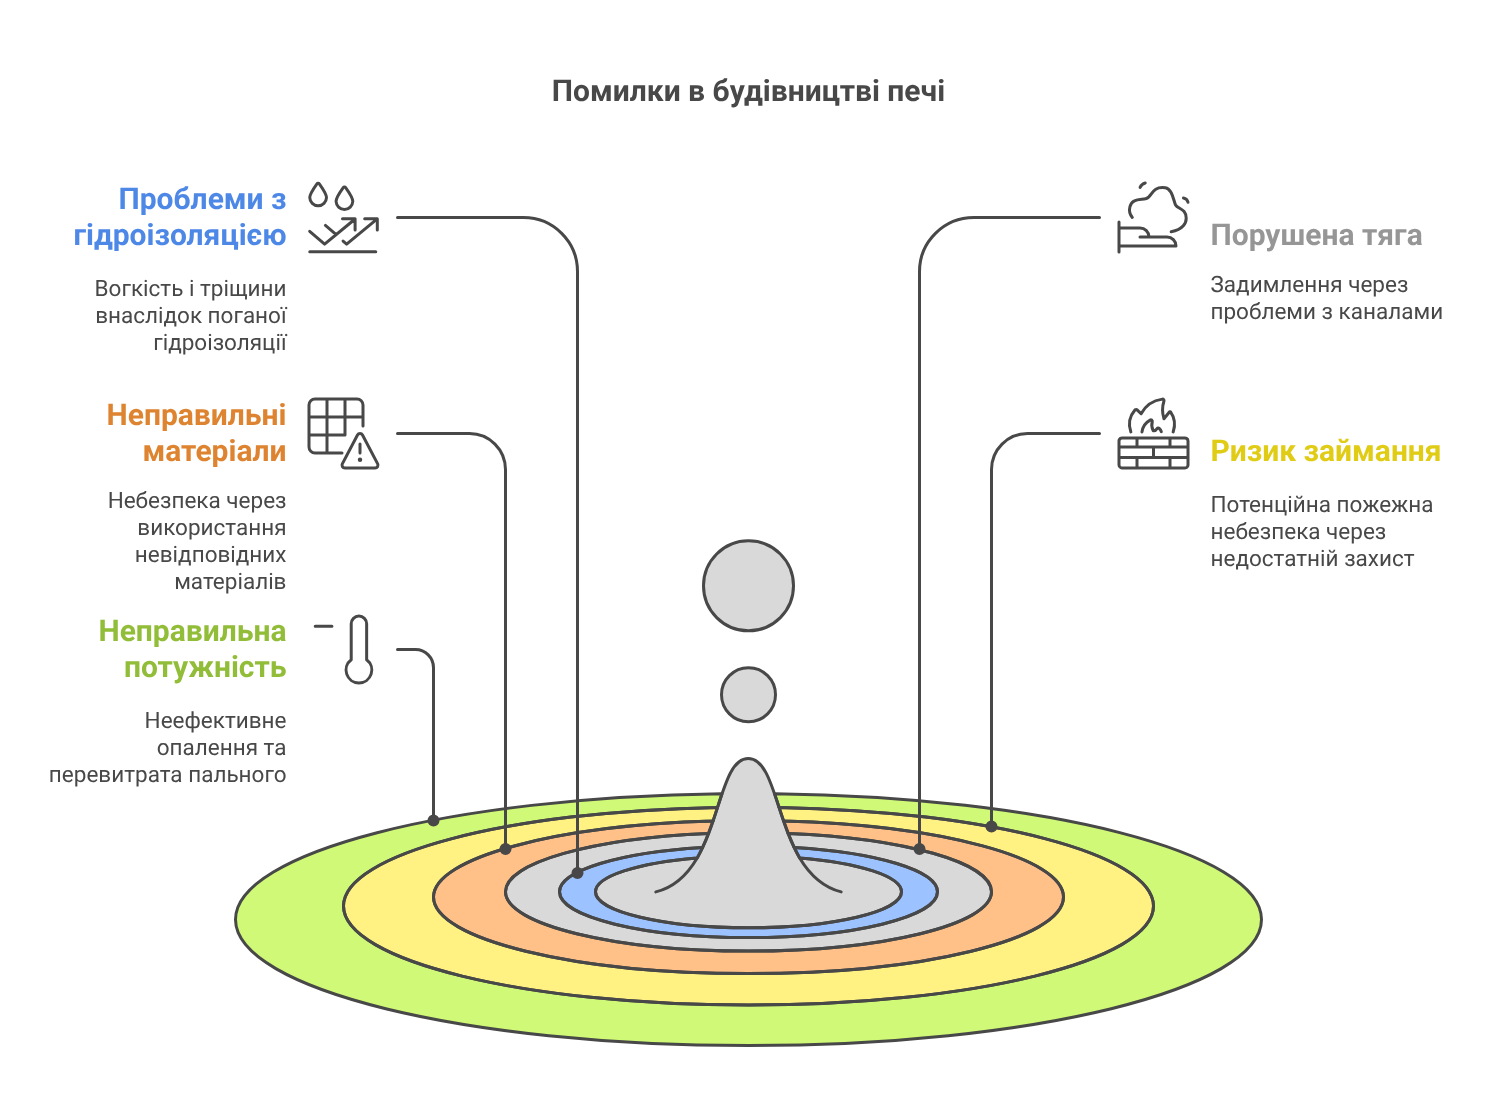
- Lack of or incorrect waterproofing of the foundation – leads to dampness in the masonry, cracks, and reduced heating efficiency.
- Disrupted masonry of the channels – reduces draft and causes smoke in the room.
- Incorrect choice of materials (for example, using regular brick in the firebox instead of firebrick).
- Insufficient protection of ceilings and walls – can lead to fire.
- Incorrectly calculated power – the stove may be too weak or too powerful, leading to fuel overconsumption or unsatisfactory heating.
Conclusion
Making a stove by yourself is a completely feasible task even for a beginner if you follow the project scheme, use quality materials, and take care of fire safety. A properly designed heating stove will reliably heat the house, and a heating-cooking stove by yourself will provide additional comfort and the ability to cook food. Follow the recommendations for choosing a location, calculating the foundation, installing the chimney, and other important aspects – and your stove will serve for a long time, creating coziness and warmth in your home.
If you are also interested in a stove-fireplace by yourself, the principles remain similar: it is important to design correctly, adhere to the masonry technology, and ensure a quality chimney. As a result, you will get not only a source of heat but also a central element of the interior that will beautify your home.
Remember: if you lack skills or have doubts, it is better to consult professionals for advice or supervision at key stages of construction. This will help avoid mistakes and ensure safe and efficient operation of the stove for many years.